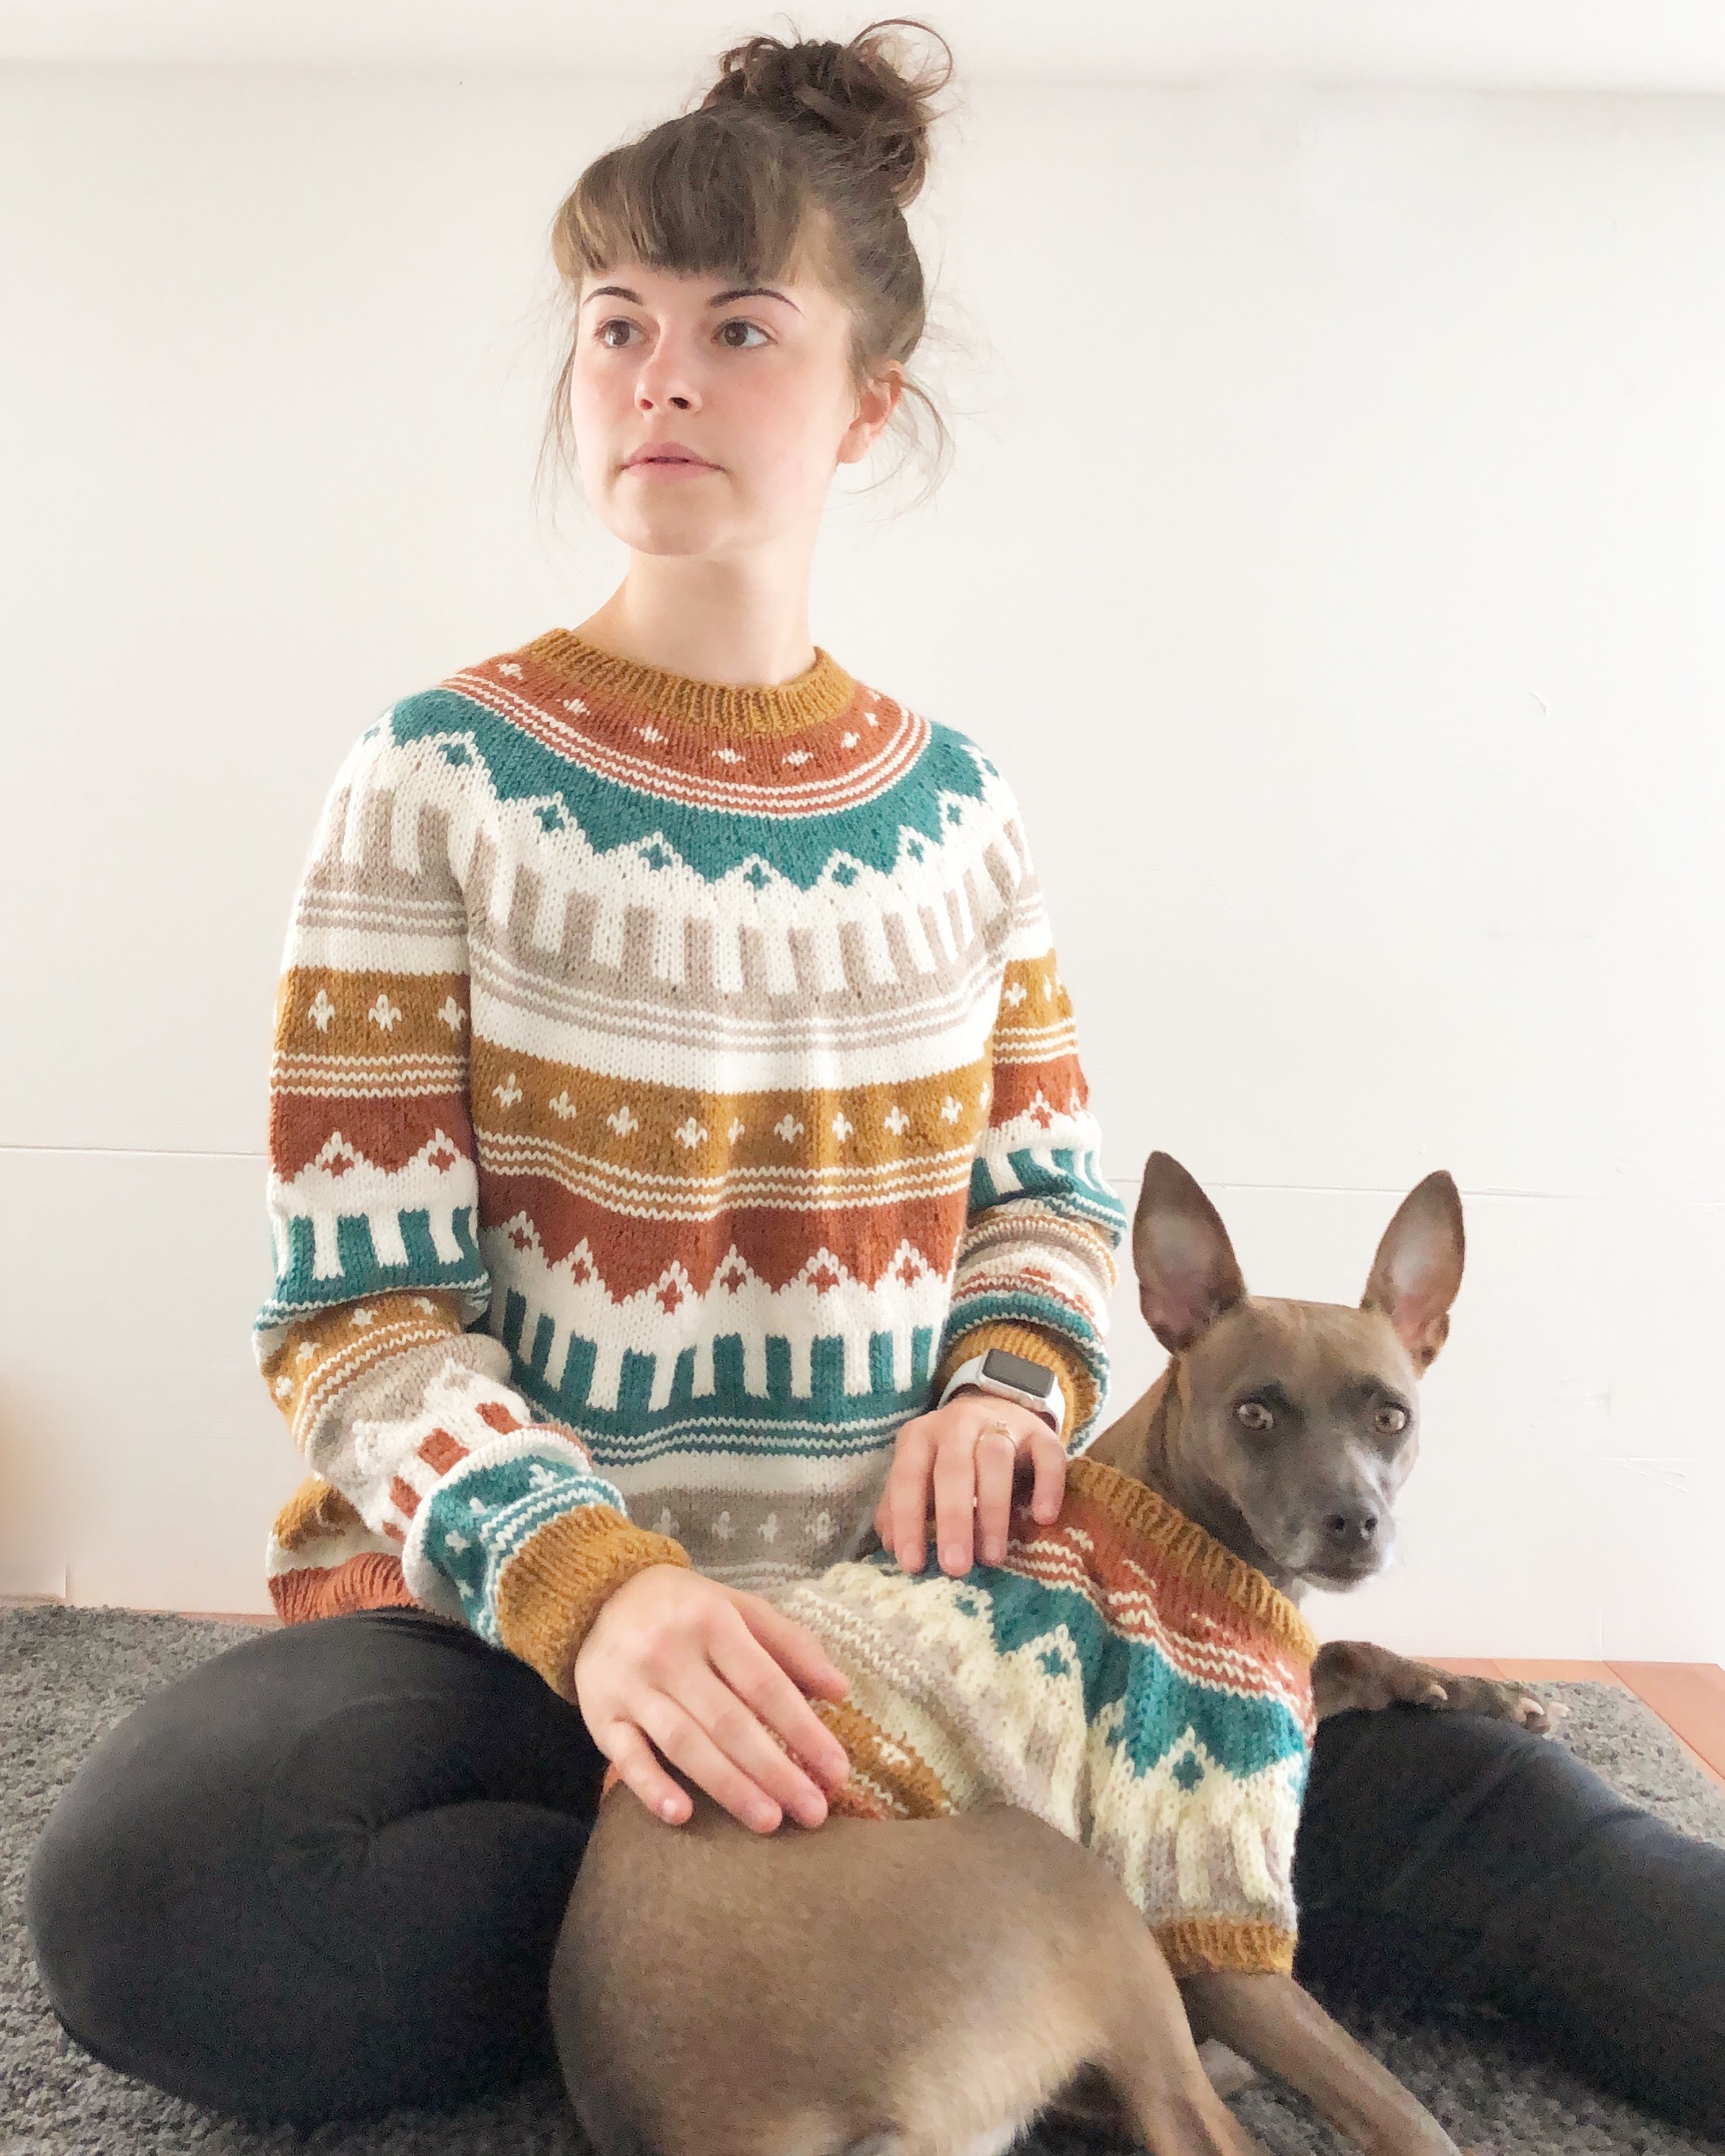


Basic Yarn Dyeing for Beginners

Hand Dyeing Yarn can be as much fun as it can be messy, but if you’re careful and read these tips thoroughly, you can avoid a lot of beginner mishaps!
My experience with hand dyeing yarn is very limited but it’s enough to get a budding yarn dyer started.
Disclaimer: I’ve dyed yarn twice, but I’ve watched a lot of tutorials on YouTube and Bluprint, I will include links to those videos at the end of this blog post. The most recent time I dyed yarn was in my tiny house, therefore this list is very concentrated and might be missing some items other dyers might deem “vital”.
Basic Materials for a small set up:
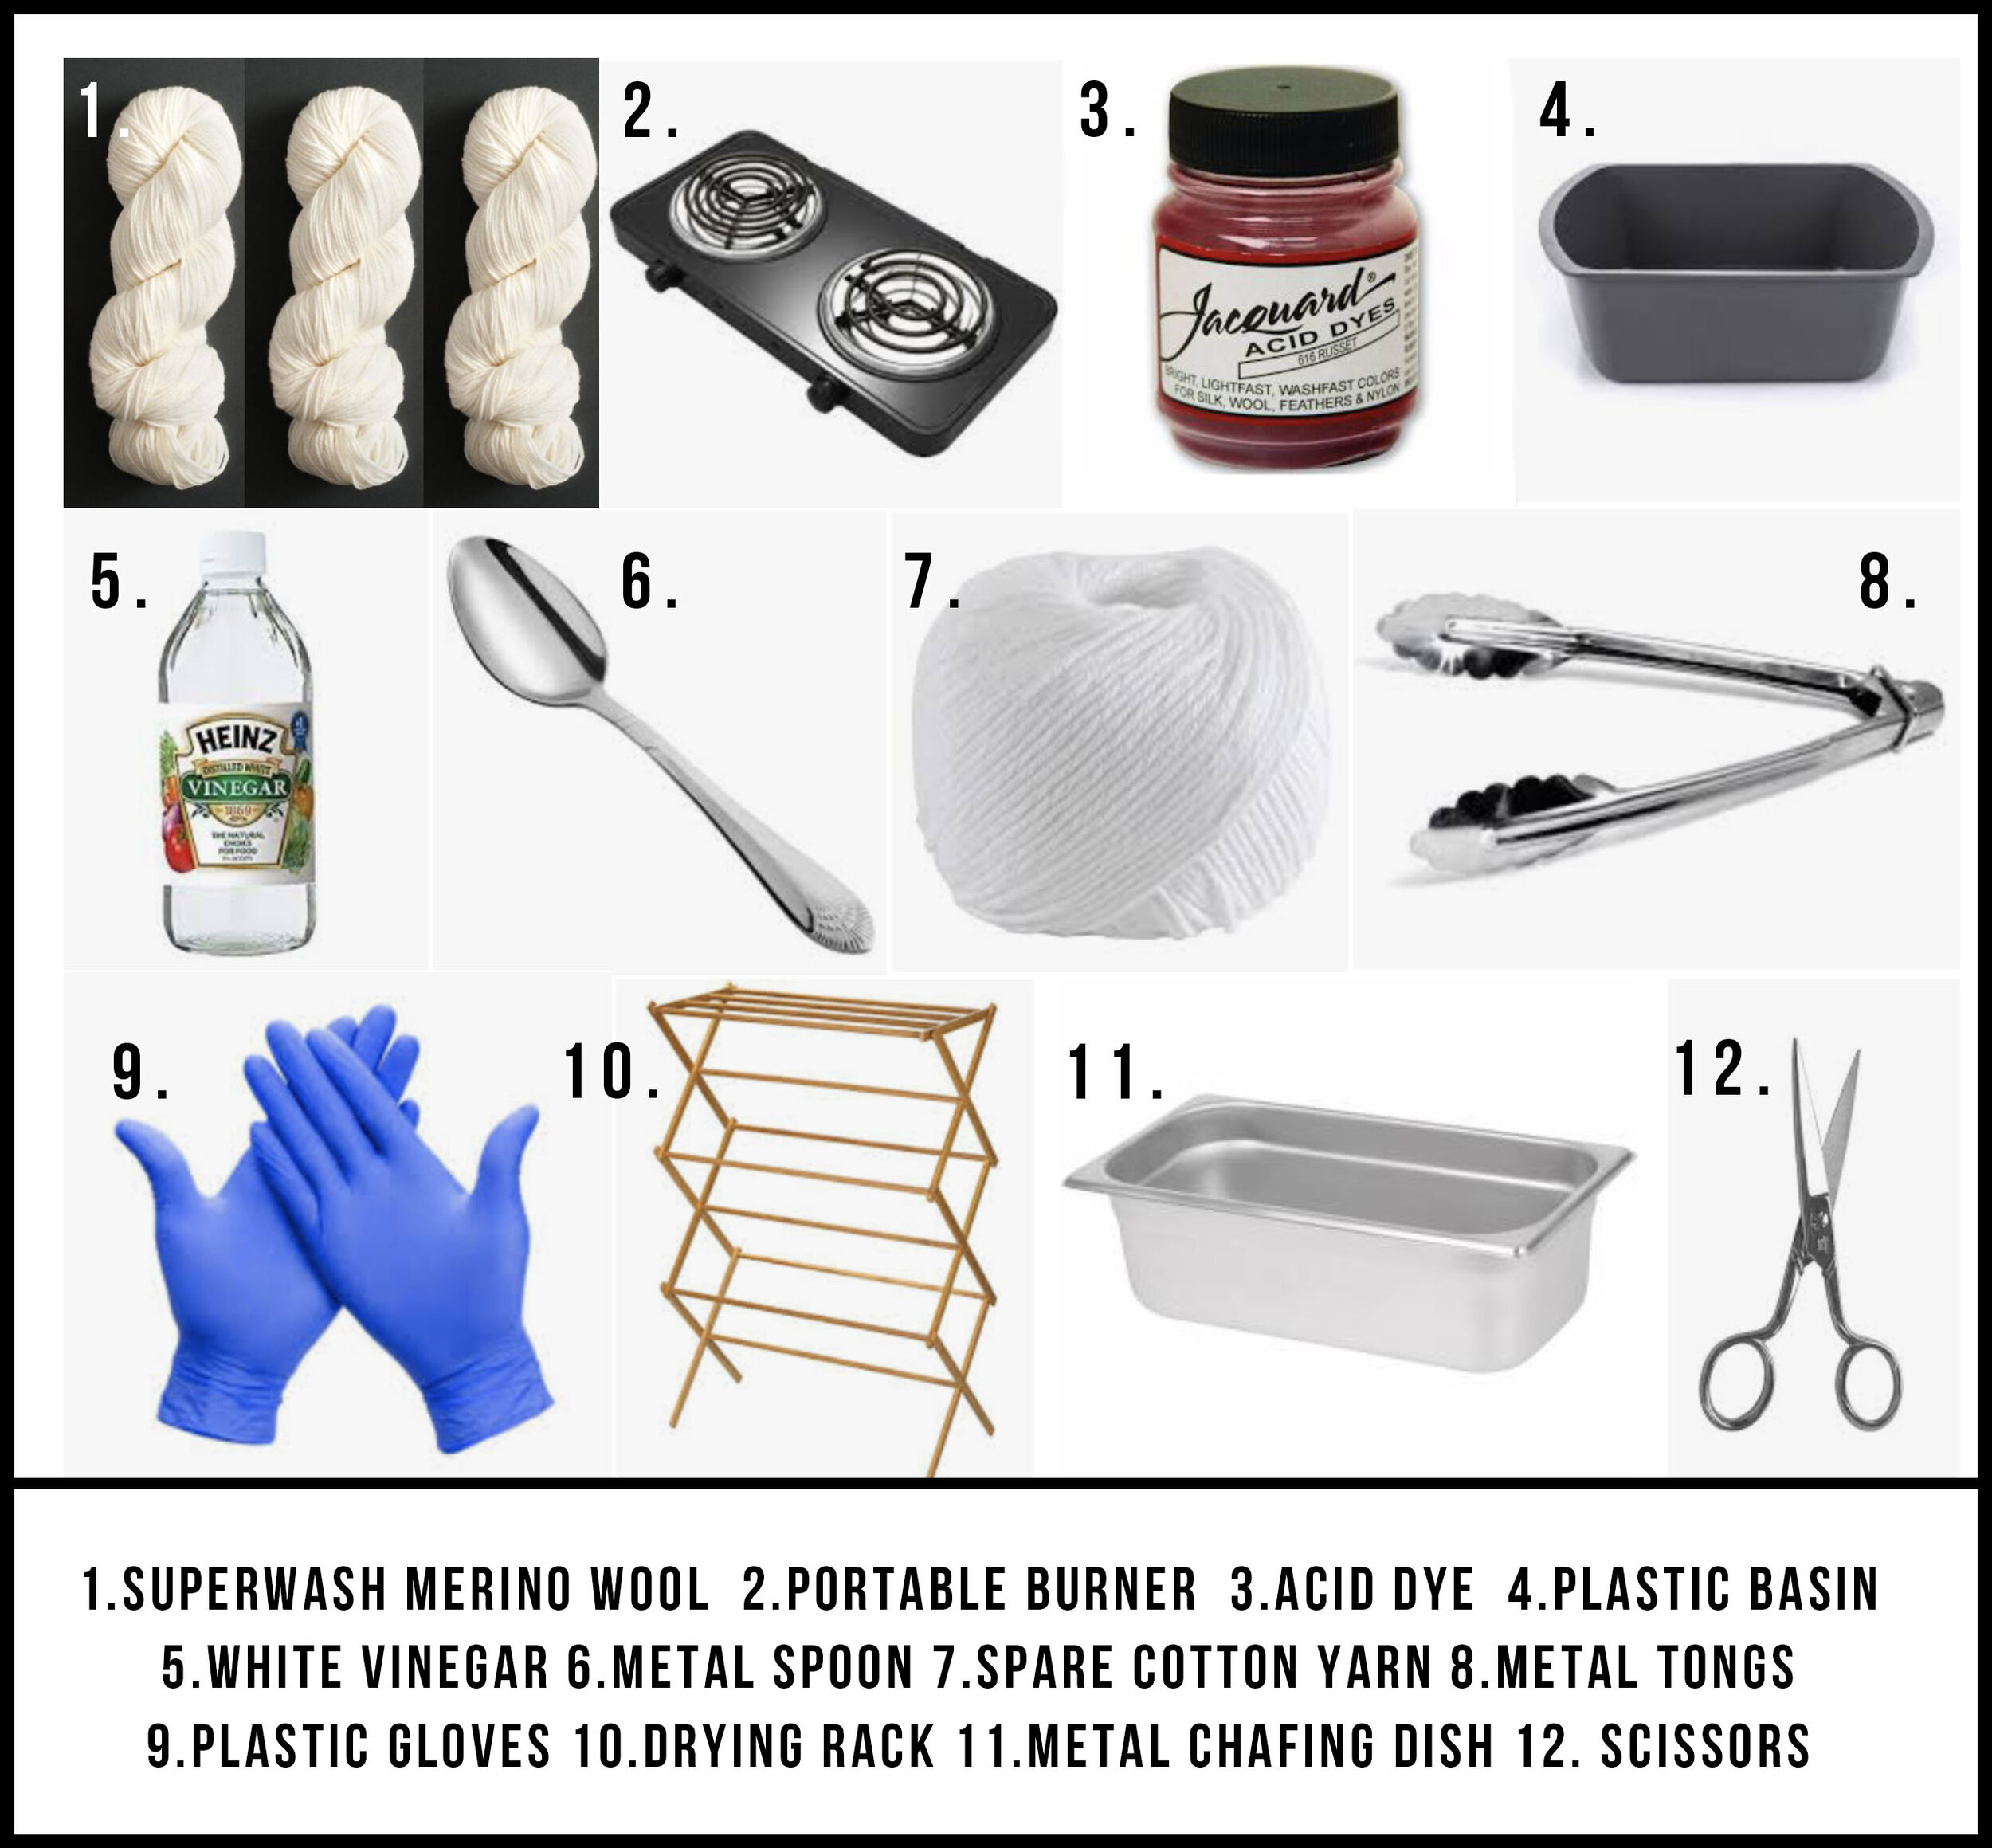
Deep Metal chafing dish for heating up the yarn (specifically designated for yarn dyeing, this shouldn’t be used for food after being used to dye yarn).
A heating element: either a stove or a plug in stove top with two burners.
Small plastic basin for soaking yarn
Superwash Merino Wool or a natural fiber in a hank (a big circle)
Yarn dye specifically for whichever fiber you have chosen (Jacquard is great)
White vinegar (24 oz is plenty)
Plastic Shower curtain rings that close
Spare cotton yarn for preparing your yarn for immersion. The reason I recommend cotton is because it doesn’t get stained by the dye that is used for natural fibers, but it’s not completely necessary. I personally used black fingering weight yarn because I knew it would be easy to spot in contrast with the yarn I was dyeing.
Gloves
Scissors
A spoon used specifically for dyeing only.
Metal tongs
An empty sink or a place to rinse the yarn thoroughly (like a spigot)
A drying rack or a couple of hangers to let the yarn dry evenly (the drying portion is really important or else it could grow mold, ew!)
Additional, non-vital tools:
A yarn swift + yarn ball winder: these are great if you want to make mini skeins
A small strainer (the size of your palm is great)
Steps:
Prepare your yarn by opening up the hank into a big circle and add a shower curtain ring onto it (for a handle). The ring should be able to easily slide around the circle of yarn, don’t try and fix it to one place, make sure all the strands of yarn are within the confines of the ring.
Take your cotton yarn or other spare yarn and create very loose figure 8 ties similar to the ties that the hank came with. The ties that originally come on the hank are too tight, so cut them out or else you will have portions of undyed yarn that will disrupt your color way.
Fill basin with water and add 1/2 cup of white vinegar.
Add your prepped skeins to the basin and soak for 30 minutes or until you can squeeze the skein and there are no bubbles. If you soak it for longer than 2 hours, the yarn might be dull once its been dyed and dried.
Place your chafing dish on your heating surface, turn it on low, and add water until you have about 1/8 - 1/4 inch of water. Add a little bit of white vinegar (3 TBS should be fine).
Gently take yarn out of basin and give it a nice squeeze so that it’s not leaking when you transfer it to the pan. Place your yarn down into chafing dish and spread it out as evenly as possible. The pan is able to hold two skeins at a time but consider doing one at a time if you’re just starting out.
Put on your gloves and start sprinkling small amount of pigment onto yarn using a spoon or small strainer. (Look below for tips on spreading dye intentionally). You will notice that the dye expands the longer it’s on the yarn and the colors may change or “break”. If the heat is up too high, the dye might “break”, which means it leaks a lighter shade of the color beyond the original dye location. Using your hands or tongs, separate the yarn so that you can sprinkle dye into empty spots. If you don’t search the skein for empty spots, you will have some glaring blank portions of your knitting that will look awkward and unpredictable. It is important to wipe your hands and your utensils in between colors so that you don’t get the dye on anything you don’t want dyed.
Turn the heat up a little bit until it produces small bubbles, then add the lid and let it simmer for 15 minutes. The simmering step is vital because it bonds the dye to the yarn and it doesn’t bleed as much. If you accidentally add too much dye, the simmering step doesn’t fix that, you’ll just have to rinse it for a long time. Make sure the pan has a little bit of water in the bottom when you leave it to simmer or else the yarn might stitch into the pan.
Once that yarn has simmered for a while, take the pan off the heater and rest it next to a sink (obviously on top of some hot pads!!). Carefully pick up the skein by the shower curtain ring, bring it into the empty sink or spigot and rinse the yarn until the water runs clear. If you added a lot of dye, or didn’t let it simmer long enough, or didn’t add enough vinegar, it might take a while for the skein to get fully rinsed. Don’t touch the yarn until its been under the water for a while because it will be raging hot after you pull it out of the pan.
Place the yarn on the drying rack (if you have a fan, it’ll help the yarn dry much faster, which means less time to wait before you get to knit!)
Twist the yarn into a hank, this is the best form if you don’t plan on using it for a while. If you want to knit with it as soon as possible, then wind it up using a yarn winder and get to work! If you don’t have a swift or a winder, get a friend to hold the hank after you remove all of the ties while you carefully wind it into a ball.
Different ways to spread the dye:
Splotches of dye all over will be very pretty and shouldn’t produce any weird color patterns in your knitting (like random icky striping)
Big patches of colors will produce stripes or long distances of the same color when knitting
A shallow amount of water and semi squeezed skein of yarn before placed into pan is ideal for speckled yarn because the less saturated the yarn is, the less bleeding will occur. I haven’t mastered how to make a white skein with sharp colored speckles, but you can probably find a video somewhere for that!
Here is a sample of a skein I dyed myself: Small amount of water, fairly saturated skein, loads of bleeding.
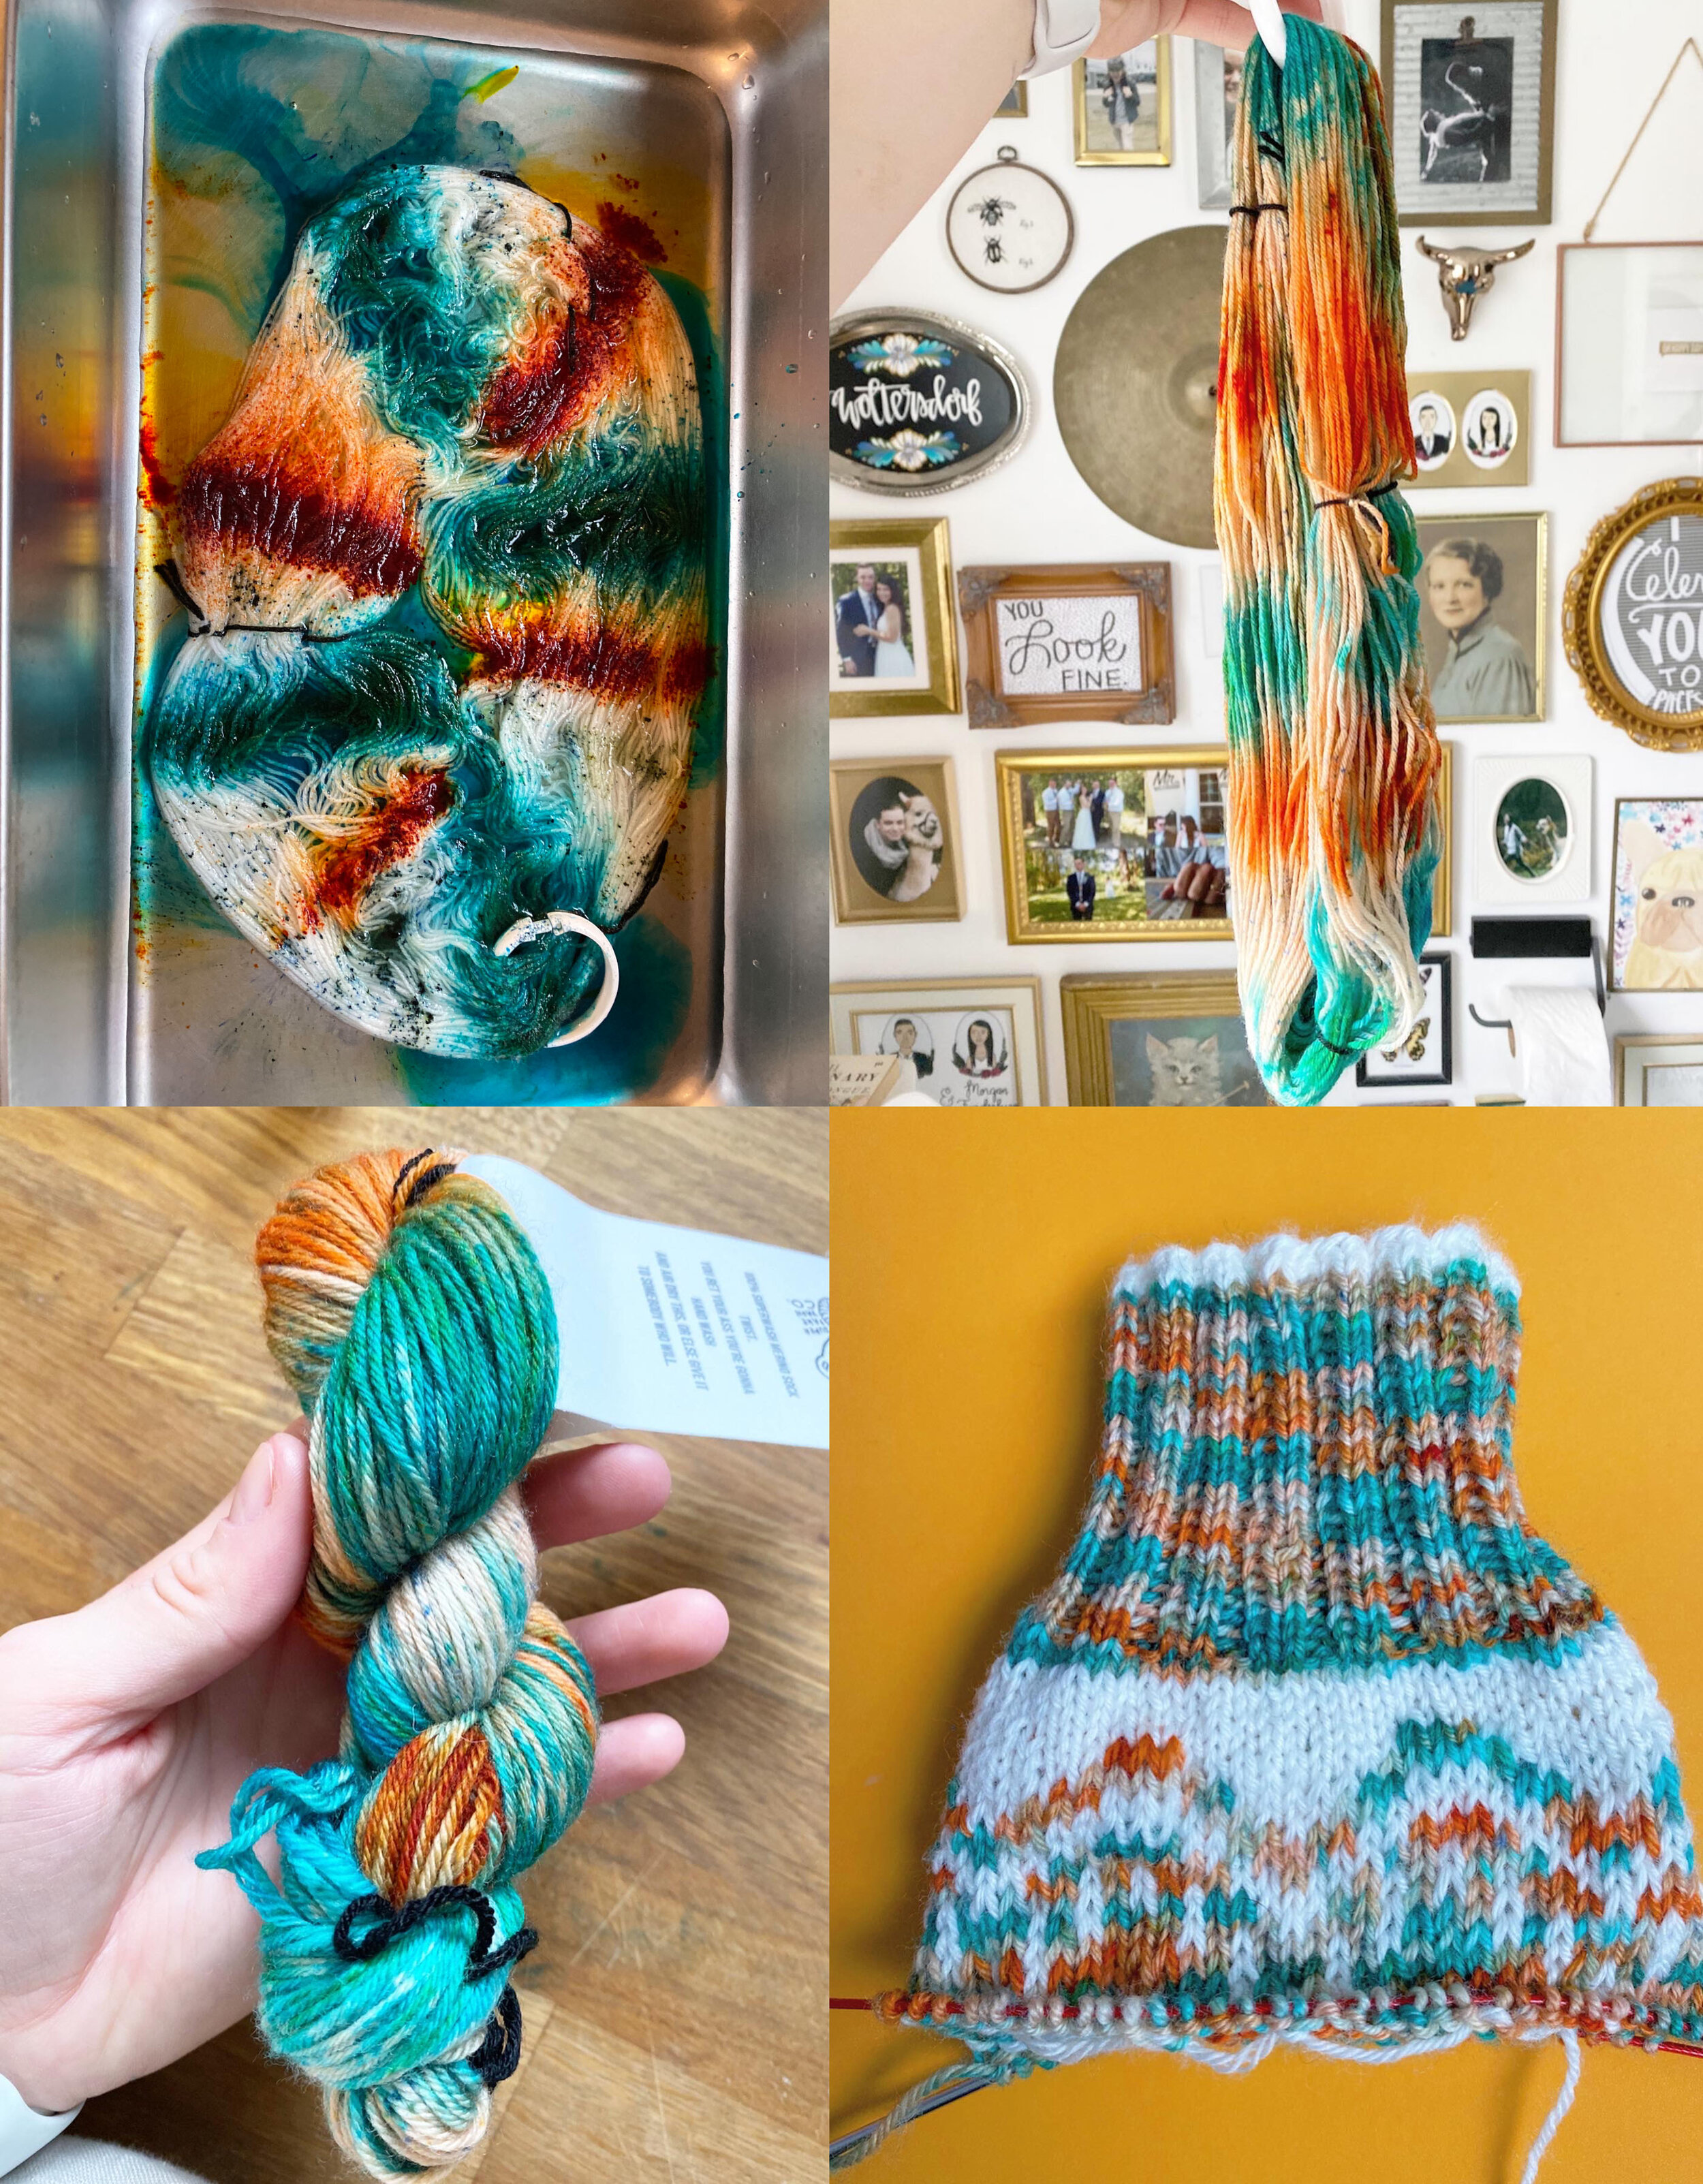
This sock is a pattern I’m developing. (1/10/20)
Here are some of my favorite videos for yarn dyeing: happy dyeing!

How to Dye Speckles
Click the blue text to watch this video on how to dye speckled yarn.
I do not own this video.

Creative Bug Studios Hand Dyed Yarn
Click the blue text to watch this video on how to dye really pretty pigmented yarn with ease!
I do not own this video.

Bluprint Course on Professional Yarn Dyeing at Home
Watch the entire Bluprint course on how to get started dyeing yarn at home. The teacher, Sarah Eyre, has been dyeing yarn for ages and knows her way around the dye pot! Bluprint is a paid subscription, but if you click here it will show you how to get a trial membership for free!
I hope his post piqued your interest and inspired you to try your hand at dyeing yarn at home!


